1、SpringBoot自动装配 Spring Framework一直在致力于解决一个问题,就是如何让Bean的管理变得更简单,如何让开发者尽可能的少关注一些基础化的bean的配置,从而实现自动装配。所以,所谓的自动装配,实际上就是如何自动将Bean装载到IoC容器中来。
实际上在Spring 3.x版本中,Enable模块驱动注解的出现,已经有了一定的自动装配的雏形,而真正能够实现这一机制,还是在Spring 4.x版本中,Conditional条件注解的出现,接下来我们来看一下SpringBoot的自动装配是怎么一回事。
1.1 自动装配例子 我们在SpringBoot中使用redis时,只需要添加redis依赖,然后进行配置即可使用,如下面配置
1 2 3 4 <dependency > <groupId > org.springframework.boot</groupId > <artifactId > spring-boot-starter-data-redis</artifactId > </dependency >
1
2
3
4
spring: redis: host: 127.0 .0 .1 port: 6379
1
2
@Autowired private RedisTemplate<String,String>redisTemplate;
按照上面配置好后,就可以使用RedisTemplate了,那么,为什么RedisTemplate可以被直接注入呢?它是什么时候加入到IoC容器的呢?这就是自动装配。自动装配可以使得classpath下依赖的包的相关的bean,被自动装载到Spring IoC容器中,那么这又是怎么做到的呢?
1.2 EnableAutoConfiguration EnableAutoConfiguration的主要作用其实就是帮助SpringBoot应用把所有符合条件的@Configuration配置都加载到当前SpringBoot创建并使用的IoC容器中。我们看EnableAutoConfiguration这个注解中,它的import是这样
1
2
@Import(AutoConfigurationImportSelector.class) public @interface EnableAutoConfiguration {...}
但是从EnableAutoConfiguration上面的import注解来看,这里并不是引入另一个Configuration,而是一个ImportSelector ,那么这个ImportSelector又是什么东西呢?可以看下Spring中@Import相关资料。了解了ImportSelector和ImportBeanDefinitionRegistrar后,对于EnableAutoConfiguration的理解就容易些了。
结合下面AutoConfigurationImportSelector类,其实EnableAutoConfiguration会帮助SpringBoot应用把所有符合@Configuration配置都加载到当前SpringBoot创建的IoC容器,而这里借助了Spring框架提供的一个工具类SpringFactoriesLoader的支持,以及用到了Spring提供的条件注解@Conditional,选择性的针对需要加载的bean进行条件过滤。
1.3 AutoConfigurationImportSelector Spring中的@Import注解可以配置三种不同的class:
基于普通的bean或者带有@Configuration的bean进行静态注入
实现ImportSelector接口进行动态注入
实现ImportBeanDefinitionRegistrar接口进行动态注入
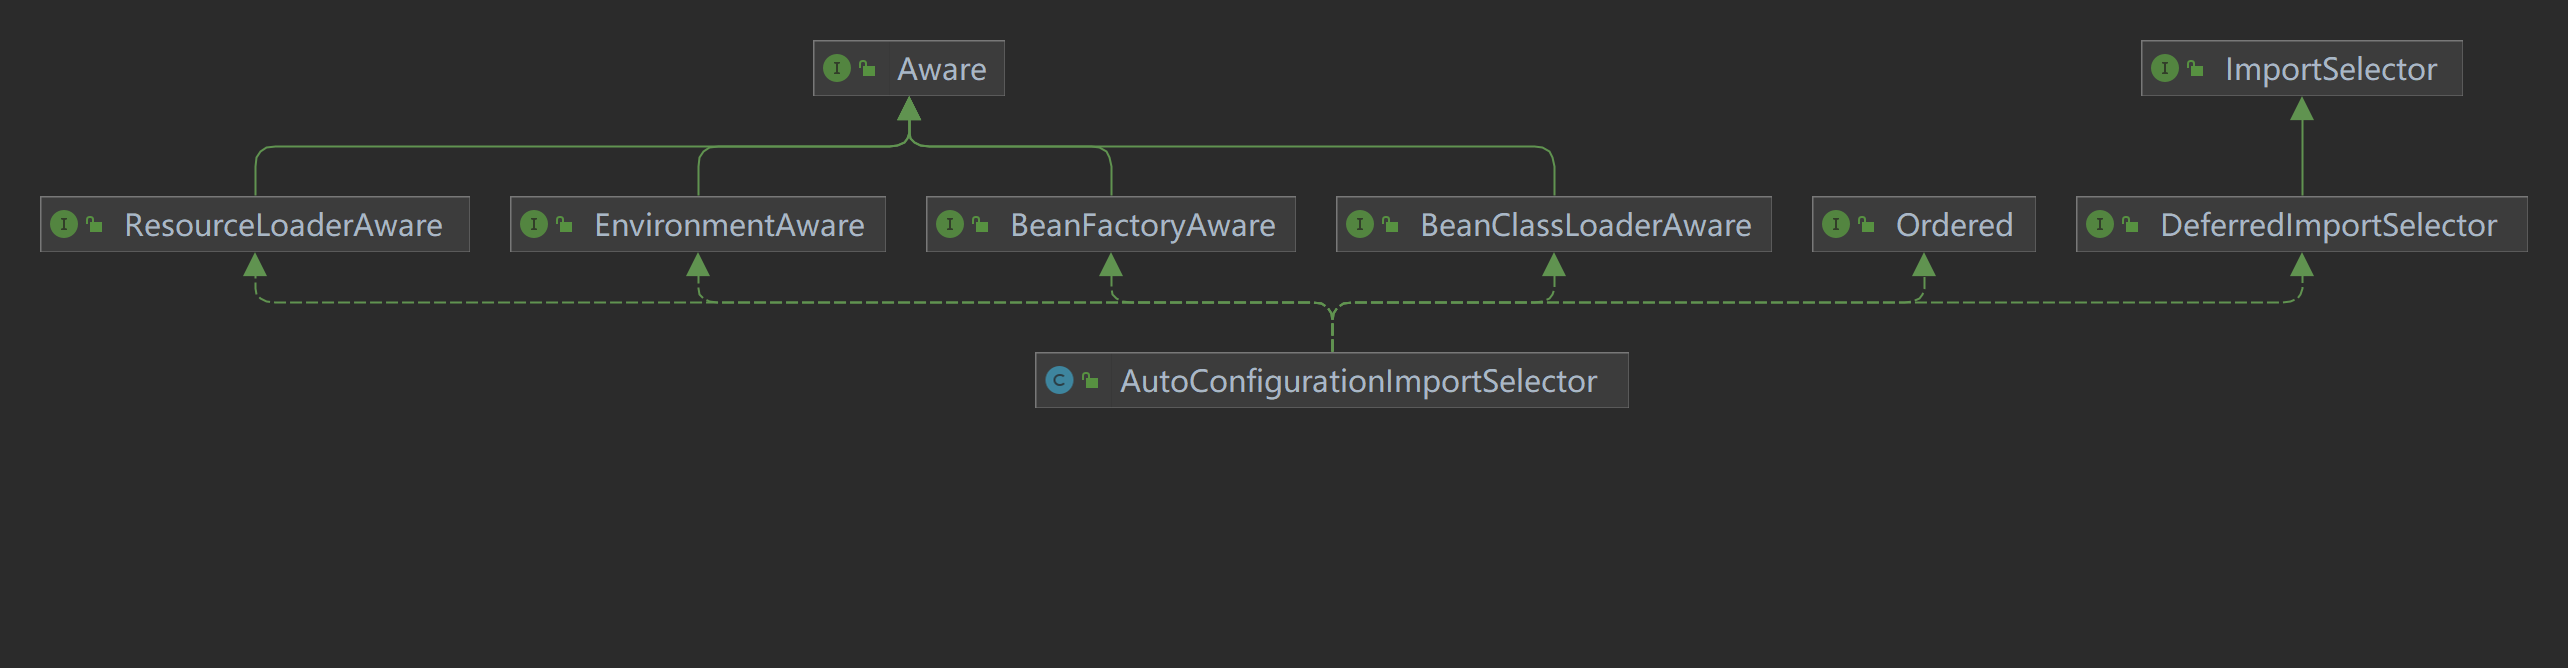
看一下AutoConfigurationImportSelector类的继承关系
AutoConfigurationImportSelector类是实现了ImportSelector接口,所以它本质上是基于ImportSelector来实现bean的动态加载。ImportSelector接口中的selectImports方法返回的数组(类的全类名)都会被纳入到Spring容器中,那么猜想这里的实现原理也是一样的,定位到AutoConfigurationImportSelector这个类的selectImports方法
1
2
3
4
5
6
7
8
9
@Override public String[] selectImports(AnnotationMetadata annotationMetadata) { if (!isEnabled(annotationMetadata)) { return NO_IMPORTS; } AutoConfigurationEntry autoConfigurationEntry = getAutoConfigurationEntry(annotationMetadata); return StringUtils.toStringArray(autoConfigurationEntry.getConfigurations()); }
1
2
3
4
5
6
7
8
9
10
11
12
13
14
15
16
17
18
19
20
21
22
protected AutoConfigurationEntry getAutoConfigurationEntry (AnnotationMetadata annotationMetadata) if (!isEnabled(annotationMetadata)) { return EMPTY_ENTRY; } AnnotationAttributes attributes = getAttributes(annotationMetadata); List<String> configurations = getCandidateConfigurations(annotationMetadata, attributes); configurations = removeDuplicates(configurations); Set<String> exclusions = getExclusions(annotationMetadata, attributes); checkExcludedClasses(configurations, exclusions); configurations.removeAll(exclusions); configurations = getConfigurationClassFilter().filter(configurations); fireAutoConfigurationImportEvents(configurations, exclusions); return new AutoConfigurationEntry(configurations, exclusions); }
1.4 SpringFactoriesLoader 这里简单分析一下SpringFactoriesLoader这个工具类的使用。它其实和Java中的SPI机制的原理是一样的,不过它比SPI更好的点在于不会一次性加载所有的类,而是根据key进行加载。SpringFactoriesLoader的作用是从classpath/META-INF/spring.factories文件中,根据key来加载对应的类到Spring IoC容器中。项目案例如下。
1 2 3 4 5 <dependency > <groupId > org.springframework</groupId > <artifactId > spring-context</artifactId > <version > 5.3.22</version > </dependency >
1
2
3
4
5
6
public class TestCore public String study () System.out.println("good good study, day day up" ); return "liyyao.com" ; } }
1
2
3
4
5
6
7
@Configuration public class TestConfig @Bean public TestCore testCore () return new TestCore(); } }
把前面的工程打成jar包,当前项目依赖该jar包
1 2 3 4 5 <dependency > <groupId > com.liyyao.springboot</groupId > <artifactId > SpringFactoriesLoaderDemo</artifactId > <version > 1.0-SNAPSHOT</version > </dependency >
通过下面代码获取依赖包中的属性
1
2
3
4
5
6
7
8
@SpringBootApplication public class SpringFactoriesLoaderTestApplication public static void main (String[] args) ConfigurableApplicationContext ca = SpringApplication.run(SpringFactoriesLoaderTestApplication.class, args); TestCore bean = ca.getBean(TestCore.class); System.out.println(bean.study()); } }
运行会报错,因为TestCore并没有被Spring的IoC容器所加载,也就是没有被EnableAutoConfiguration导入。解决方案,在TestCore项目resources下新建文件夹META-INF,在文件夹下面新建spring.factories文件,文件中配置key为自动配置类EnableAutoConfiguration的全路径,value是配置类的全路径
1 org.springframework.boot.autoconfigure.EnableAutoConfiguration =com.liyyao.springboot.TestConfig
重新打包,重新运行SpringFactoriesLoaderTestApplication这个类,可以发现我们编写的那个类就被加载进来了。
1.5 SpringBoot中的条件过滤 在分析AutoConfigurationImportSelector的源码时,会先扫描spring-autoconfiguration-metadata.properties文件,最后在扫描spring.factories对应的类时,会结合前面的元数据进行过滤,为什么要过滤呢?因为很多的@Configuration其实是依托其他的框架来加载的,如果当前的classpath环境下没有相关联的依赖,则意味着这些类没必要进行加载,所以通过这种条件过滤可以有效的减少@Configuration类的数量从而降低SpringBoot的启动时间。
在1.4案例中,修改TestCore项目,在META-INF下增加配置文件,spring-autoconfigure-metadata.properties。
1 com.liyyao.springboot.TestConfig.ConditionalOnClass =com.liyyao.springboot.TestClass
格式:自动配置的类全名.条件=值
上面这段配置意思就是如果当前的classpath下存在TestClass,则会对TestConfig这个Configuration进行加载。
沿用1.4案例中spring-boot工作的测试代码,直接运行main方法,发现原本能够被加载的TestCore类现在在IoC容器中找不到了。在当前工程中指定的包com.liyyao.springboot下创建一个TestClass以后,再运行代码,发现程序就能够正常运行了。
1.6 手写Starter 通过手写Starter来加深对于自动装配的理解
1.6.1 创建一个Maven项目,quick-starter
1 2 3 4 5 6 7 8 9 10 11 12 <dependency > <groupId > org.springframework.boot</groupId > <artifactId > spring-boot-starter</artifactId > <version > 2.7.3</version > </dependency > <dependency > <groupId > com.alibaba</groupId > <artifactId > fastjson</artifactId > <version > 1.2.79</version > <optional > true</optional > </dependency >
定义一个格式转换接口,并且定义两个实现类
1
2
3
4
5
6
7
8
9
public interface FormatProcessor <T> String format (T object) ; }
1
2
3
4
5
6
public class JsonFormatProcessor implements FormatProcessor @Override public <T> String format (T object) { return "JsonFormatProcessor: " + JSON.toJSON(object); } }
1
2
3
4
5
6
public class StringFormatProcessor implements FormatProcessor @Override public <T> String format (T object) { return "StringFormatProcessor: " + object.toString(); } }
首先定义格式化加载的Java配置类
1
2
3
4
5
6
7
8
9
10
11
12
13
14
15
16
17
@Configuration public class FormatAutoConfiguration @ConditionalOnMissingClass("com.alibaba.fastjson.JSON") @Bean @Primary public FormatProcessor stringFormatProcessor () return new StringFormatProcessor(); } @ConditionalOnClass(name = "com.alibaba.fastjson.JSON") @Bean public FormatProcessor jsonFormatProcessor () return new JsonFormatProcessor(); } }
1
2
3
4
5
6
7
8
9
10
11
12
13
14
15
public class HelloFormatTemplate private FormatProcessor formatProcessor; public HelloFormatTemplate (FormatProcessor processor) this .formatProcessor = processor; } public <T> String doFormat (T obj) { StringBuilder builder = new StringBuilder(); builder.append("Execute format : " ).append("<br>" ); builder.append("Object format result : " ).append(formatProcessor.format(obj)); return builder.toString(); } }
1
2
3
4
5
6
7
8
9
@Configuration @Import(FormatAutoConfiguration.class) public class HelloAutoConfiguration @Bean public HelloFormatTemplate helloFormatTemplate (FormatProcessor formatProcessor) return new HelloFormatTemplate(formatProcessor); } }
在resources下创建META-INF目录,再在其下创建spring.factories文件
1
2
org.springframework.boot.autoconfigure.EnableAutoConfiguration =\ com.liyyao.springboot.config.HelloAutoConfiguration
install打包,然后就可以在SpringBoot项目中依赖该项目来操作了。
1.6.2 测试
1 2 3 4 5 <dependency > <groupId > com.liyyao.springboot</groupId > <artifactId > FormatProject</artifactId > <version > 1.0-SNAPSHOT</version > </dependency >
1
2
3
4
5
6
7
8
9
10
11
12
13
14
@RestController public class UserController @Autowired private HelloFormatTemplate helloFormatTemplate; @GetMapping("/format") public String format () User user = new User(); user.setName("liyyao" ); user.setAge(18 ); return helloFormatTemplate.doFormat(user); } }
1.6.3 自定义Starter关联配置信息 有些情况下我们需要用户在使用的时候动态的传递相关的配置信息,比如Redis的IP,端口等,这些信息显然是不能直接写到代码中的,这里我们就可以通过SpringBoot的配置类来实现。
1 2 3 4 5 <dependency > <groupId > org.springframework.boot</groupId > <artifactId > spring-boot-configuration-processor</artifactId > <version > 2.7.3</version > </dependency >
1
2
3
4
5
6
7
8
9
10
@ConfigurationProperties(prefix = HelloProperties.HELLO_FORMAT_PREFIX) public class HelloProperties public static final String HELLO_FORMAT_PREFIX = "liyyao.hello.format" ; private String name; private int age; private Map<String, Object> info; ...getter setter... }
1
2
3
4
5
6
7
8
9
10
@Configuration @Import(FormatAutoConfiguration.class) @EnableConfigurationProperties(HelloProperties.class) public class HelloAutoConfiguration @Bean public HelloFormatTemplate helloFormatTemplate (HelloProperties helloProperties, FormatProcessor formatProcessor) return new HelloFormatTemplate(helloProperties, formatProcessor); } }
1
2
3
4
5
6
7
8
9
10
11
12
13
14
15
16
17
18
19
public class HelloFormatTemplate private FormatProcessor formatProcessor; private HelloProperties helloProperties; public HelloFormatTemplate (HelloProperties helloProperties, FormatProcessor processor) this .formatProcessor = processor; this .helloProperties = helloProperties; } public <T> String doFormat (T obj) { StringBuilder builder = new StringBuilder(); builder.append("Execute format : " ).append("<br>" ); builder.append("HelloProperties : " ).append(formatProcessor.format(helloProperties.getInfo())).append("<br>" ); builder.append("Object format result : " ).append(formatProcessor.format(obj)); return builder.toString(); } }
在这个工程的META-INF/下创建一个additional-spring-configuration-metadata.json,这个是设置属性的提示类型
1
2
3
4
5
6
7
8
9
10
11
12
13
14
15
{ "properties" : [ { "name" : "liyyao.hello.format.name" , "type" : "java.lang.String" , "description" : "账号信息" , "defaultValue" : "root" },{ "name" : "liyyao.hello.format.age" , "type" : "java.lang.Integer" , "description" : "年龄" , "defaultValue" : 18 } ] }
在SpringBoot项目中的properties文件中进行属性信息的配置
1
2
3
4
liyyao.hello.format.name =liyyao liyyao.hello.format.age =25 liyyao.hello.format.info.key ="zhangsan" liyyao.hello.format.info.value ="haha"
重新启动SpringBoot项目进行访问